Archive for the ‘Ringtones’ tag
How to create an iPhone ringtone from any mp3
Guess who’s back, back again? Now that I’m a working man (more of which, I promise, will come in due course), writing for a living, it’s about bloody time I pulled up the bootstraps on this here blog and blew the dust off it a little bit.
So, musings and opinions to come in full flow in the days and weeks to come (not least helped because I’ll have a new laptop by then) but in the meantime, a practical one that seems a little bit uncovered by the world at large: how to make an iPhone ringtone from an mp3 file.
This how-to was prompted by Red Mum’s tweet earlier seeking guidance on it, frustrated that there’s an overwhelming amount of paid-for software out there that professes to do a job that any iPhone owner can already do for nothing – without having to download a ringtone from the iTunes store.
(I should add for the benefit of anyone with an AAC file – identified by the file extension .m4a – is already most of the way there, and you can skip down to Step 7.)
So – here goes nothing.
1. Open iTunes and find the file that you’re looking to convert. As a presumptive iPhone user, I can be fairly confident that you already have iTunes installed. If you’re one of the new that doesn’t, then I’m afraid the usual tactic of manipulating free software like Audacity doesn’t work (or, at least, not to my knowledge anyway) because it can’t export the file type you’ll need. You’re also going to need iTunes to put the ringtone on your phone in the first place, so you’re a little flummoxed here.
If the file you’re looking to convert isn’t in the iTunes library, simply play it in iTunes or drag it into the iTunes window and it’ll add.
2. Hit Control (or the Apple key) and comma to open the Preferences window. You’ll need to get in here to change the type of file that iTunes burns by default – more on this in a moment.
3. On the ‘General’ tab, after the ‘When You Insert a CD’ option, hit the ‘Import Settings’ button. This is the option where you tell iTunes what kind of audio files you want it to create when you rip a CD into your music library – you can, if you want, rip the tracks into a size-guzzling .wav file or into a more bog-standard .mp3 file.
This feature has more than one function, though, because you can also use it to convert files that are already in your library to other formats. So, if you wanted to make a .wav file out of an mp3 you already have (or, more probably, the other way around), you can use this iTunes feature to do it.
4. In the window that pops up, on the ‘Import Using:’ drop-down menu, choose ‘AAC Encoder’. This is the format that you’ll need to turn your file into before iTunes will recognise it as a ringtone.
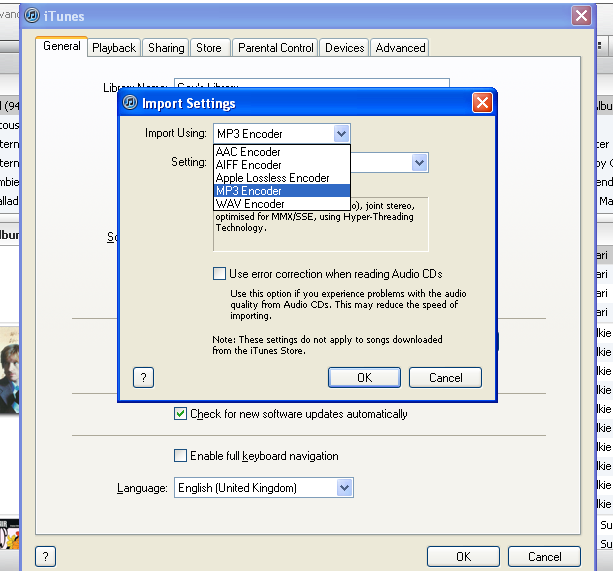
As long as you choose AAC, you can leave the other settings as you like them. Click OK and exit from all the pop-ups until you’re back looking at the file you want to convert.
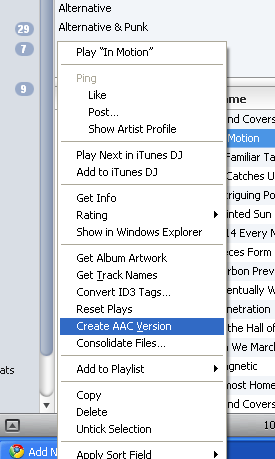 5. Right-click the file you want to use as a ringtone, and choose ‘Create AAC version’ (pictured right). The file will begin to convert into an AAC file. When it is done, you’ll hear a three-note jingle that you might recognise as the default SMS tone on the iPhone.
6. The converted version of your file will now appear in your library just below the original file. See it? It should look almost identical to the previous one. Now right-click the file and click ‘Show in Windows Explorer’ (or, ‘Show in Finder’ if you’re on a Mac). A window will pop up showing where the file is on your hard drive.
7. Rename the file extension from .m4a to .m4r. This is pretty much the only fundamental change you’ll be making to the file. In a Mac, the file extension should appear at the end of the filename by default. In Windows, if you just see the name of the song and not a file extension, then follow these instructions to display the extension.
(If you’re a little like me and can’t stand having an iTunes library with dead links in it, at this point you should go back into iTunes and delete the duplicate file from your music library because the file – songname.m4a – technically doesn’t exist any more.)
8. Double-click on the newly-renamed file and it will open in iTunes as a ringtone. Voila! Now that it’s in your iTunes library as a ringtone, you can drag it onto your iPhone or tell iTunes to sync it when you next plug your phone in.
As a housekeeping measure, you might want to go back into Preferences (again, Control and comma) and change the import default back into an MP3, which makes your files more universally usable. Of course, if you weren’t ripping MP3 files to begin with, then there’s no such problem.
Hope you find this useful. 🙂